
Your journey through the less traveled parts of your vehicle brings you to the topic, perhaps a looming task, of headliner repair. Understanding this role player in the aesthetics and insulation of your car is quintessential to keeping your vehicle's interior in top shape. A sagging or detached headliner might not be the end of the world, but it sure can put a damper on the interior's overall ambiance and even pose some safety risks. This guide aims to simplify this process, illuminating each step from its fundamental understanding, through collecting the necessary materials, performing the repair, and ensuring long-term maintenance. Buckle up and let's get started!
Understanding the Basics of Car Headliners
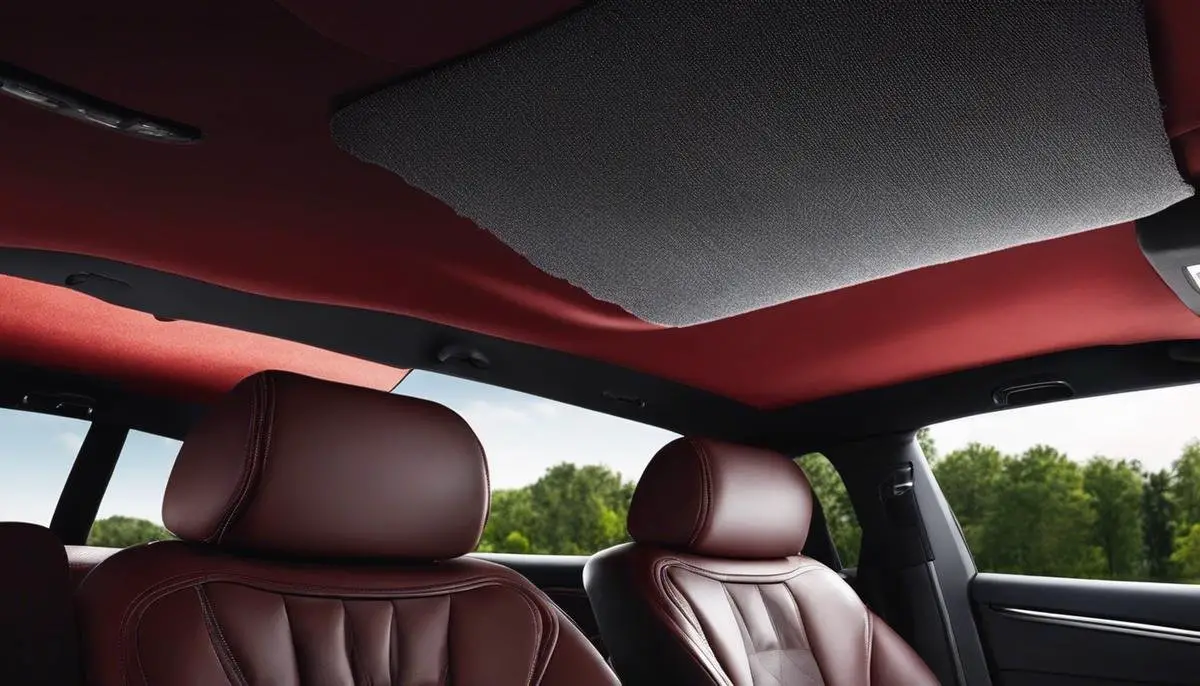
Car headliners – a term relatively unknown to many drivers, are a significant feature of every vehicle. A car headliner, to put it simply, is the material used to cover the interior ceiling of a car. It's typically a composite material that consists of a fabric layer bonded to a lightweight foam backing. It ends up creating a pleasant and visually attractive surface that contributes to the overall aesthetics and comfort of a car’s interior. Although most won't notice it at first, it does its fair share of duties beyond just sprucing up the look of the interior.
If that's the story, then why might it need repairing you ask? Well, there are a few reasons car headliners may require fixing, and all are worth being mindful of.
One of the most common problems car headliners face is sagging. Yes, the same fate that our skin and muscles succumb to after a specific age, befalls the humble car headliner too. This usually happens due to the deterioration of the foam backing with age, exposure to sunlight and heat, or simply poor quality materials. The adhesive that binds the fabric to the foam backing can also deteriorate over time, leading to the fabric portion of the headliner drooping or sagging down.
When a headliner starts to sag, it's not just an unsightly view, but it may also obstruct a driver's vision, especially if the sagging happens towards the front of the vehicle near the rearview mirror. This poses a potential safety hazard which can affect the driving experience and safety.
Now, as much as everyone loves a good DIY project, fixing a headliner certainly requires some skills. Failing to install it properly can lead to it sagging again sooner rather than later, and can produce wrinkles and bubbles that end up looking worse than the initial sagging. A continuous process of taking down and putting back your headliner also risks damaging other vehicle parts such as the interior dome lights, sun visors, or handles.
Another good reason to maintain your headliner is for the resale value of your vehicle. A car with a sagging or damaged headliner will lose its appeal to potential buyers. Besides, a well-maintained headliner enhances the overall comfort of your ride, serving more than just aesthetic function – it offers some level of noise reduction by providing an additional layer of insulation in the car.
In a nutshell, while car headliners might not be the first thing a driver notices, they play a significant role in a vehicle's interiors. Their practical purposes, along with the visual appeal, mean that keeping an eye on your headliner for any sign of sagging, warping or damage is a smart move for any car owner. Maintaining it not only ensures a comfortable and quiet ride, but it also safeguards the overall value and safety of your vehicle.
Identifying Required Tools and Materials
Cruising into Necessary Tools and Materials for Headliner Repair and Their Significance
Diving straight into action, let's examine the crucial instruments and materials needed for headliner repair, a journey that transforms you into a hands-on car enthusiast. Absorb the essence of what it takes to bring a sagging car headliner back to life and give your vehicle that fresh, well-maintained aura it truly deserves.
First thing's first - a sturdy set of screwdrivers is a must. Since removing the large amount of hardware holding the trim and the headliner in place is your first order of business, having screwdrivers of various sizes will make the job much easier. This diverse range of sizes ensures the correct fit for each screw, preventing damage to the screw heads and your vehicle's hardware.
Now, to the exciting part, the headliner fabric. Understanding the type of fabric your vehicle's headliner needs is crucial, as compatibility plays a major role in the process. Ideally, foam-backing fabric is the best choice, with its durability and ease of installation standing undeniably superior. Remember, taking the time to ensure a color match with your vehicle's interior will drastically improve the overall aesthetic, making you love your passion project even more.
Next up, the unsung hero of headliner repair - headliner adhesive. This adhesive is specially designed to bond lightweight materials, creating a strong permanent hold between your car's roof and the headliner fabric. Its resistance to the heat inside your vehicle prolongs the life of your new headliner, steering clear from the dreaded sag once again.
A tool that often goes unnoticed until the twelfth hour crisis, globe removal tools should be on your must-have list. These handy helpers provide non-marring removal, crucial for maintaining the integrity of your vehicle's interior.
Every restoration enthusiast knows, upholstery or a putty knife can be a game-changer. These versatile tools assist in removing the old fabric and adhesive residue, ensuring the process is smooth sailing as you prep for the new material.
Finally, seal the deal with a good quality fabric cleaner. A final wipe-down, post-repair, helps remove any residual adhesive, giving your new headliner a crisp, clean finish.
Voila, your road warrior is ready to roll with a fresh look and increased vehicle value, thanks to your dedicated tinkering. You've embraced the excitement and creativity involved in such a venture, showcasing the value of knowing what tools and materials are needed to realize the outstanding makeover of a car headliner.
Step-by-Step Guide to Fixing the Headliner
First off, the initial step in fixing a faulty car headliner involves the removal of the old one. This will require a set of sturdy screwdrivers to detach the headliner board from the ceiling of the car. Be careful while doing this because too much force may result in damaging other components of the vehicle.
Having completed that, the next step involves choosing the right headliner fabric for your car. It's essential to note the compatibility here. The fabric must be able to withstand the temperature changes as well as humidity. Additionally, it must be sturdy and durable to resist wear and tear. While choosing the fabric, ensure that its color matches or complements the car’s interior decor for uniformity purposes.
Once the fabric is securely chosen, it is time to consider the importance of headliner adhesive in the process. The adhesive is responsible for bonding the fabric to the board, ensuring that it stays in place once the repair is done. Ensure to use an adhesive that is specially designed for headliner fabric due to their high-temperature resistance, thus maintain their integrity during extreme weather conditions.
A proper globe removal tool is significant in the process of fixing the car headliner. This tool simplifies the task of removing the dome light, any screws, clips or handles on the ceiling. This prevents accidental damage to the underlying parts of the roof, maintaining vehicle integrity.
Additionally, an upholstery or putty knife becomes useful at this stage. This tool plays a critical role in scraping off any old fabric and adhesive from the board without damaging it. The smoother the board, the better the outcome as it allows for a neat and precise attachment of the new fabric.
The final step in the process is adding the finishing touch using a fabric cleaner for a clean finish on the newly installed headliner. This ensures that any dirt, dust, or grime that may have accumulated during the installation process is removed. This step adds to the shiny new look of your newly-fixed headliner, ensuring your car not only looks great but smells fresh.
Fixing a car headliner may seem a daunting task, but with the right knowledge and tools, it is perfectly achievable. It not only adds to the visual appeal of your vehicle but also ensures safety and comfort while driving. It is these incremental steps taken with diligence and passion that transform the ordinary into the extraordinary. Here's to many more trips along the open road under a perfectly fitted headliner!
Remember, the value of a car extends beyond horsepower and torque. It's the combined effect of hundreds, if not thousands, of working parts – the headliner included. Great journeys are often defined by the little things we sometimes take for granted. So get under that headliner, it's time to gear up and dive right in.

Caring and Maintenance Tips for Car Headliners
Moving on to ensuring the durability and longevity of the revived headliner is an integral piece of the headliner puzzle. After painstakingly effecting repairs, it would be disappointing to see the handiwork deteriorate rapidly. So, what can be done?
Quality comes first. Be picky about the materials used. It's essential to choose an adhesive that is heat resistant and crafted specifically for automotive repairs. An adhesive specifically made for headliners possesses qualities that make it more tacky, providing a stronger bond. It's worth investing in a reliable product to avoid re-doing the process.
Fabric plays a critical role as well. Choose a material that can resist heat, not just for resilience but for motorists' comfort as well. Opting for a slightly thicker fabric can also offer better durability. In the same vein, acquiring sun visors and ditching the cling films can protect the headliner from the sun's damage, thus boosting its longevity.
Also, don’t overlook the installation part. Be slow, precise, and ensure the fabric is adequately stretched to avoid wrinkles. Air bubbles can lead to the loosening of the fabric, triggering sagging. To mitigate this, professionals recommend using a wallpaper roller or credit card-like object to flatten any bubbles during the adhesive application process.
Post-repair maintenance also plays a pivotal role. Clean the headliner regularly with a microfiber cloth to keep the fabric looking crisp. Cleaning needs to be gentle, as aggressive brushing might wear off the adhesive prematurely.
But here’s a golden tip: avoid dragging heavy items across the headliner. This can damage not only the fabric but also interfere with the tension holding it in place. If accessories need to be added into the interior roof, be careful not to puncture the headliner. Remember, small damages can gradually turn into a big headache.
Finally, consider uninstalling roof-mounted accessories not pertinent to the car's function. The additional weight these accessories put on the headliner could lead to sagging over time.
Granted, these suggestions might seem trifling, but they make a considerable difference in maintaining a headliner's lifespan. When care is taken in material selection, installation, and maintenance, a car headliner will remain functional and aesthetically pleasing for a longer period, giving peace of mind to everyone inside the vehicle.
Just like that, you now find yourself equipped with the knowledge and steps necessary to successfully repair and maintain your car's headliner. The beauty of it all, beyond simply improving the visible aspect of your vehicle, is that you're enhancing the overall lifespan and functionality of your car. From understanding the basics to learning how to care for your renovated headliner, you're not just a car owner anymore – you’re a bonafide car caretaker. It's much like tending to a home, your attention to detail now will prevent major fix-ups down the line. Here's to many more sag-free, well-insulated rides in your future!
Image Source: https://writio.com/
Related Posts

How Does Air Conditioning Work in a Hybrid Car: A Complete Guide
Did you know that the air conditioning system in a hybrid car can significantly impact its fuel effi...
How to Remove Paint Overspray from Car Windshield: Expert Tips
Struggling with stubborn paint overspray on your car windshield? Removing it can be a hassle, but fe...
How Much Is It to Register a Car: Understanding Fees and Taxes
Registering a car comes with its share of expenses, and understanding the costs involved, including ...
Tech Behind: Why Radiator Fan Runs When Car is Off?
Most seasoned car owners have experienced or heard the unsettling sound of a vehicle's radiator fan ...